Things aren’t like they used to be when I was a kid. I know I had more toys than my parents did when they were kids, but my kids have way, way more toys than I ever did! I was overwhelmed by the vastness of their toy collections (and the clutter they caused) until I finally made a toy rotation system.
Toy cycling organization is actually a part of Montessori parenting, but anyone can (and should) do it. And it’s a lot easier than you think! The hardest part is rounding up all the toys to begin with, but once they’re in toy rotation storage, you’ll never have to do it again.
What about cleanup, you say? Just wait till you learn why you don’t have to do it anymore. Adding new toys to the rotation is a piece of cake, too! I’ll discuss how to start a toy rotation and answer all of the questions I had when I did it for the first time. Since this is a really big topic, click a link below to jump to the section you’re most interested in!
What Toy Rotation Means
Toy rotation is a Montessori concept that has become widely popular among all childcare providers and parents, even if they don’t engage in other Montessori practices. It was after I became interested in creating a Montessori toddler room that I first discovered toy rotation.
Basically, you’re breaking your kids’ complete collection of toys into small, manageable groups and rotating them at your preferred interval. It usually involves getting rid of a lot of toys (the broken, the cheap junk, and the completely unused). What’s left is separated methodically into categories, then toys from each category are combined into specific rotation bins.
Toy rotation works for babies, toddlers, and even older children. It’s easiest to start when your child is still a baby, but it’s never too late.
Benefits of Toy Rotation
While leaving all the toys out to be available to your children at all times isn’t necessarily detrimental to their development, there’s a lot to be praised about the practice of toy rotation.
Reduced Clutter
When your kids only have a dozen or so toys available to play with, that means only a dozen or so toys can possibly be scattered around the house at any given time!
Reduced Anxiety in Your Kids
It’s no secret that there is such a thing as too many choices, and this absolutely applies to playtime for your kids. They’ll be able to make quicker decisions about what they want without getting overwhelmed.
Better Parent-Child Relationships
Toy clutter is a huge source of tension for many parents, and that stress is often expressed as anger or frustration with their kids. Get rid of the clutter and you get rid of the yelling!
Deepened Imaginative Experiences
When children aren’t bouncing around from toy to toy all day, they learn to practice extended play. New ideas will grow in their minds for how to use what’s available to them.
Easier Cleanup
Let me repeat: EASIER CLEANUP! Not only is it a much faster process to pick up 12 toys than it is to pick up 60, your children will be more able to do it themselves. Assigning an achievable cleanup task will boost your kids’ confidence and personal pride.
Better Toy Selection
You simply can’t keep 200 toys and make the toy rotation system work properly (unless you want to create 20 rotation bins!). This process forces you to decide what toys are the best quality, and also directs you to create a varied selection that better stimulates your child’s various skills each day.
Better Appreciation for Toys
My children weren’t all that brokenhearted whenever they broke a toy before, because there were always three more at arm’s length to play with. Now, not only do they take better care of their toys, they are playing (enthusiastically!) with toys they wouldn’t have given the time of day previously.
Fewer Fights
Believe it or not, having fewer toys available usually means your kids fight less over toys, and spend more time playing together! The overwhelm of too many choices can lead a child to say “I’ll just take what he’s got,” which causes arguments. When there aren’t many choices, children tend to naturally share and work together.
You Know What They Need
Once you’ve created a toy rotation, you’ll know the inventory inside and out. That means you can make more precise gift recommendations based on what your kids need (because you’ll know which categories listed below they are lacking in).
Putting New Toys Away is Easy
Instead of dreading birthdays and holidays, you’ll know that finding a home for new toys is as simple as replacing an item in a rotation from the same category (and selling or donating the old one).
The Best Age for Toy Rotation
The best age to start a toy rotation is when your baby has become mobile (such as crawling) and is going after toys themselves. Rotating toys for babies is not at all overkill, because even a 6-month-old can be overwhelmed by too many choices. That being said, it’s never really too late to start! You can implement a toy rotation for a 5-year-old, a toddler, or even older children that show signs of anxiety over their toy collections.
How Often to Rotate Toys
Many parents try to stick to a daily or weekly toy rotation, but you can go longer if it suits your family (and it doesn’t have to be a strict schedule at all). A daily toy rotation is not practical for families where both parents work outside of the home, but it can be easy to accomplish for some stay-at-home caregivers and is really beneficial to the children they care for. Working parents will probably want to stick to a biweekly schedule, especially if their children are only home a few hours each weekday to enjoy the available toys.
Your toy rotation can be daily, weekly, biweekly, monthly, or just whenever you notice your child getting bored with what’s on display. If they are playing with the same single toy a couple of days in a row, it’s probably time to shake things up. You don’t have to wait until every toy in the rotation has been played with, though that is one of the goals of this process. But waiting can lead to boredom faster. If you notice a toy in a rotation is never played with, it’s probably time to donate and replace it.
My tips for setting a toy rotation schedule are:
- Set realistic expectations. While it doesn’t take long to pick up the few toys that are out and get out a new bin, it does still take some time and effort. Working parents are usually too tired to do this on a work day.
- Watch your child and make the best decision based on their behaviors.
- Set reminders in your phone to swap out toys, or even reminders to evaluate if you need to rotate (if you don’t feel the need to keep a strict schedule).
- Don’t be afraid to change the schedule if the first one you pick doesn’t seem to be working out.
Splitting Toys into Rotations
You probably don’t need to worry about not having enough toys for a toy rotation. If anything, you probably still have too many. Ideally, you’ll have at least four toy rotation categories (but you could easily have up to eight or more), four total rotations (though you could have less or more as needed), and a couple of toys from each category in each rotation. The math adds up to a minimum of 32 toys (keep in mind this is assuming a toy rotation for one child).
However, there is NO strict rule. If you have many more toys (most people do – we easily had 5x that many toys to start with), you can accommodate them in a number of ways:
- Add more rotations to the mix
- Create more categories and make them more specific
- Add another toy or two per category to your rotations
- Get rid of toys that don’t really belong in there! Weed out the less-stimulating activities and remove toys your child has outgrown.
Easy Number of Toys Per Rotation
If you want a really simple toy rotation, your child will do just fine with 8 toys available at a time. Try to limit each category to 2-3 toys per day, though you can always add more categories or up the number of toys in each to four (though I’d recommend that as the max per category per day). The goal is not to fill toy bins to the brim, but to keep everything visible with plenty of empty space. This makes it easier to know where to put toys back, too.
Toy Rotation with More Than One Child
While you don’t really need to double or triple your available toys with each added child, you could try increasing each rotation by one toy per category per additional child.
Most children of toy-playing age will all play with the same toys, regardless of manufacturer-recommended age ranges. It’s really just babies and toddlers who tend to need their own set of toys. Do your best to ensure you have a variety of activities to engage each age group that will be playing with the toys in each rotation.
But what if you have, say, a baby, a 4-year-old, and a 10-year-old? Creating a toy rotation for multiple age groups can seem impossible, but it’s really not. A baby will require fewer toys to be entertained than the older children. Past the toddler stage, many older children are happy to play with toys intended for young children as well.
If you’re worried about younger children getting into small pieces of a playset belonging to an older child, put that toy in the older child’s bedroom or up where the toddler can’t reach it, rotating as normal. Older children are more than capable of (and willing to) keep their special toys out of tiny hands. Just explain the need to keep their younger siblings safe.
Toy Rotation Categories
Creating toy categories for toy rotation might seem daunting when you think about the wide assortment of stuff your children have around the house. The easiest way to break down their massive collection is to create categories for sorting them out. Once you have your categories, deciding which toys to rotate becomes much more logical. Think of these categories like food groups: you want your kids to get a little bit from each category each day, but it’s okay if they don’t always meet the daily goal every day. There’s always tomorrow!
An effective toy rotation will include a collection of toys that inspire imaginative cross-play in your child. While your options revolve around your child’s existing toy collection, below are some categories to give you ideas for sorting. And although your baby might not have all these types of toys, this is a good list of Montessori toy rotation categories and will usually stay the same (or maybe even pare back down) as your child gets older.
- Construction: wooden blocks, duplo/lego, train set/car tracks, nesting cups
- Puzzles & Games: matching, sorting, memory, spot the difference
- Vehicles: cars, boats, construction vehicles, airplanes/helicopters
- Play Figures: family, jungle animals, dinosaurs, sea animals
- Music Toys: singing toys, microphones, toy instruments, music players
- Soft Toys: teddy bear, soft doll, small pillow, branded plush
- Art Supplies: crayons, chalks, paints, play dough
- Books: seek and finds, touch and feel, talking books, story books
It’s okay if you don’t have the right toys to fill all of these categories. Just come up with at least 4-5 categories that work best for you.
You also might choose not to put art supplies in the toy rotation if you’re not comfortable with your child having unlimited access to them. Alternatively, you can rotate this category separate from the rest, wherever you do store your art supplies out of reach. (In my house, they’re stored in a drawer in our kitchen server. I keep the out-of-rotation supplies in a bin hidden under my bed!)
Daily Toy Rotation Ideas for a Toddler
It’s always easier to wrap your head around a new project when you have a specific example to work with. Here are some sample rotation toys you might have for a three-year-old. They are the exact rotations I made for my son!
Rotation 1
- Duplo blocks from a single boxed set
- dinosaur shape-matching puzzle
- garbage truck
- collection of shark toys from a boxed set
- toy drum set
- stuffed Paw Patrol dog
- two play-dough tubs with a Chewbacca hair-growing Play-Doh toy
- Finding Nemo seek-and-find book
Rotation 2
- Lincoln logs
- alphabet flash cards
- rescue helicopter
- pirate ship play set
- singing Scout the Dog plush
- finger paints
- Never Touch a Dinosaur book
Rotation 3
- wooden letter blocks
- large-piece Peppa Pig puzzle
- Noah’s Ark playset with animal figures
- handheld Toy Story karaoke machine
- giant plush elephant
- sidewalk chalk
- push-to-talk First Words book
Rotation 4
- snap-together car track
- bucket of toys with shape-sorting lid
- four Hot Wheels cars
- Paw Patrol dog figure set
- phrase-repeating hamster toy
- magic cape
- crayons and coloring book
- Where the Wild Things Are book
Big Toys and Play Sets
Kitchens, big dollhouses, large race tracks, riding toys, etc. don’t really need to be rotated. Their functions in your child’s imagination usually fluctuate based on the smaller toys available that day!
Active movement toys are also great to leave out, like balls, bicycles, and sports equipment. With children spending so much time on screens as they get older, it’s important to give them plenty of fun ways to get up and move on a daily basis.
Categories Without Enough Toys
First, consider if you really need that category. Can that toy also fit into one of your other categories? Are you sure there aren’t more toys that can go in that toy’s initial category? Get creative and think about the activity behind the toys to create your categories.
For example, a dump truck is for hauling, right? Other toys that can be rotated in this category include purses or bags, pop-up houses with handles, or a handled bucket of Mega Bloks. Sure, these items could also fit in the pretend play and building categories, but that doesn’t mean you have to sort them that way.
You can also share toys with friends and other local moms that participate in toy rotation. Sharing is very in spirit with toy rotation!
How to Set Up Themed Toy Rotation
If you’re not sure how to start a toy rotation, that’s okay – I’ll walk you through it! First of all, any type of toy rotation is beneficial to your child. There’s no exact science to this process because not all kids have the exact same toys. The point is that rotated toys feel new and exciting again.
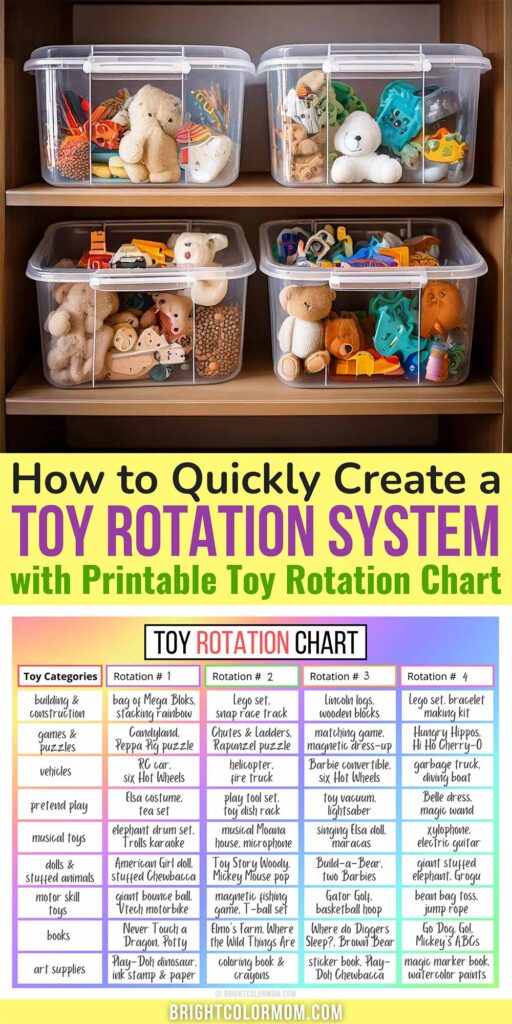
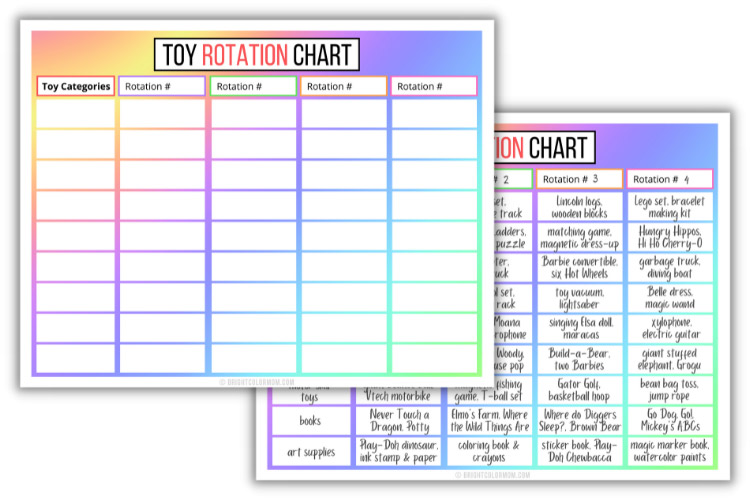
Also, be sure to check out the free toy rotation chart below! It’ll help you visually categorize your toys and create your rotations without having to move them all around a dozen times.
1. Get Some Containers
This can be a big chore if your child has a lot of toys, so preparation is important! In the beginning, you’ll just need a bunch of boxes, bags, or any kind of large-ish containers for sorting your toys. These containers will make it easier to sort items into categories without accidentally mixing them back up. You can also designate containers for trash and donation items.
In addition to your whatever-you-have-available containers for sorting, you’ll want at least four (and up to eight) good-sized totes for storing your finalized rotations. I recommend they be large, opaque, and with locking lids. I really like these bins that come opaque in black and purple, and they stack easily, too!
- Tidy Up in Style: Eliminate household clutter with the versatile…
- Durable for Indoors & Outdoors: Built from sturdy, solid plastic that…
- Lightweight Stackable Design: Features a lightweight build with…
- Comfortable Soft-Grip Handles: Ergonomically designed handles make it…
- Functional Storage: Not only practical, the lidded containers offer a…
2. Tell Your Child the Plan
If you’re creating toy rotations for a baby or a young toddler, you can really skip this step. But if your child is old enough to hold a conversation with you, this is a very wise step to take. They will notice toys “missing,” no matter what age they are. The ones that can talk will very clearly voice their displeasure and concern if they’re not prepared for it!
Explain that some of their toys are going on a vacation, but that they’ll be back. For older kids, just explain the benefits to them as listed in this article! They’re likely to understand better than you might think. Tell them cleanup will be easier for them, and doing a toy rotation will make Mommy happier, too. My son loves doing anything that makes Mom happy.
3. Collect All the Toys
Start by rounding up ALL the toys in the house in one large space, like the family room. You’ll want to do this when the kids are asleep, at school, or at a friend’s or relative’s house. Otherwise, you will constantly be interrupted and bargained with by your children, and the process will take much longer.
Toss the junk you find along the way, including toys with broken parts, puzzles and games with missing pieces, fast food “prizes,” and cheap party favors. Set aside toys to donate that still have plenty of life left in them but that your kids have outgrown or literally have never played with.
4. Divide the Toys into Categories
Do not attempt to make your rotation collections just yet! For this step, you’re just putting like with like. Divvy the toys into categories, such as these:
- building and construction toys
- games and puzzles
- vehicles
- pretend play toys and dress-up clothes
- musical toys
- social/emotional toys (dolls, stuffed animals, etc.)
- motor skill-encouraging toys
- arts & crafts supplies
- books
Some toys may fit into more than one category, so use your best judgment for placing them. You can always set multi-category toys aside and see which categories have the least toys, then add them to those categories to help even things up. You may even realize you have several toys that fit into a category not described here – and that’s great! Don’t be afraid to categorize in the way that makes the most sense for you and your child.
But don’t create extra categories for the sake of keeping more toys. Now is the time to pare down even further. Has that toy ever been played with? Might it finally catch your child’s eye in a minimized toy rotation? Do they already have a toy like that? Make tough decisions now: your child only needs one Barbie styling head and only one garbage truck.
5. Create Rotation Collections Using Each Category
Now that you’ve categorized your remaining toys, it’s time to start making your toy rotations! Pull 2-4 toys from each category at a time, keeping in mind opportunities for cross-play with the toys chosen.
For example, a tea set from the pretend play category could pair really well with a set of Barbie dolls from the social/emotional category. Dinosaur figures from pretend play could pair well with a cityscape Lego set from the building category!
Ideally, you will end up with at least four toy rotations (and hopefully not more than 6 or 7). I strongly recommend keeping written lists of what’s in each toy rotation bin, and you can use my free toy rotation chart below to do so. If for any reason you need to find a specific toy, you’ll know which bin it’s in with a simple reference sheet. This will also come in handy for doing inventory and replacing old toys in the rotations with newcomers, and I’ll talk more about that in a minute.
6. Keep All Active Toys in a Central Location
Part of the Montessori method of education is keeping everything where children can reach it. This instills confidence and a sense of independence in your child. It even includes art supplies – so be sure to use washable markers and paints!
Create a station for holding the toys currently in rotation, like a cube shelf (no taller than your child) with shallow baskets or clear bins. I don’t recommend using fabric cube bins, because your child won’t be able to see what toys are in them (and they’re really much too big for a small rotation of toys anyway). The more visible the toys are, the better!
- NO MORE FLOPPY, WEIRDLY SHAPED BASKETS: “My baskets came flat and…
- 5 BASKETS FOR 5X THE ORGANIZING POWER: Life is messy…but your house…
- MADE FROM SAFE, NATURAL COTTON: Nom, nom, nom! When you’re revamping…
- ELEGANTLY DESIGNED TO MATCH ANY DECOR: Classic neutral colors that…
- DOUBLE REINFORCED & SCATCH-FREE DESIGN: When you’re a full-time mom…
Don’t be afraid to just put one or two toys on each shelf – empty space is good! It’s not visually overwhelming for your child and makes it easier for them to put toys away.
While some people are strict about only having one shelving unit for displaying toys, I personally have a small shelf in each child’s room as well as one in the basement (our family room) where most of them are kept.
If you find that your child has an absolute favorite toy that they ask for and play with every single day, don’t deprive them of it. Just leave it on the shelf and rotate the rest. Encourage your child to play with their favorite toy in different ways. If they refuse to play with anything else and only ever perform one activity with the toy, you may have to start putting it away for a day or two at a time to encourage other activities.
7. Out with the Old, In with the New
Once you have your toy rotations created, you no longer have to stress about all the new toys that show up at birthdays and Christmas! If you’ve kept lists of what’s in your toy rotations from each category, just determine what categories the new toys belong in, and replace the old toys your child seems to have outgrown or lost interest in.
This genius system makes it easy to keep toys from multiplying and overflowing your play space! You will easily be able to keep your total number of toys the same.
This video is a great way to quickly see the benefits of toy rotation (and how easy it is to swap things out)!
Free Toy Rotation Chart
If you’re a visual organizer like me, I know how much a good chart can come in handy for a project like this. I’ve designed one that can be used over and over again as you update your toy rotations. You can print multiple sheets and number your rotations accordingly, no matter how many rotations you decide to create.
The first column is for jotting down your preferred category ideas. Then you can start filling in your child’s toys into their appropriate category rows until all of your rotations are full! This printable toy rotation chart is available in my shop, but if you’re reading this, you get it for FREE with the coupon code TOYMOM.
Toy Rotation Storage Ideas
If you’re struggling with ideas for how to store your out-of-rotation toys, don’t worry! I’ve got plenty of ideas to help out. Once you’ve determined your toy rotations, put each set in its own large plastic or cardboard storage container with a clear label (Rotation #1, Rotation #2, etc). If you want to have daily toy rotation boxes, you could even label them by the day of the week!
Plastic containers for toy rotations should be opaque so your children cannot see inside them if they happen to come across them. Out of sight, out of mind – or the purpose of the toy rotation has been defeated! My preferred toy rotation bins are these stackable bins with locking lids.
You can also have some special bins set aside for seasonal and holiday toys, so you can rotate them in at the perfect time of year and make their presence on the shelf truly special. Set reminders in your phone to pull them out at various times of the year (like getting out water toys in the summer, or a snowy train set at Christmas time).
Once you have the toys stored in bins, what do you do with all the bins?! Well, there are lots of places to put them, depending on what you have available. Some ideas include:
- a basement storage area
- the garage
- the top of your closet, or
- (if there’s nowhere else) the top of your child’s closet
If you must keep the bins in your child’s room, just make sure they are kept where your child cannot reach them and definitely use the opaque containers linked above.
Whether or Not to Discuss with Your Child
I touched on this topic earlier when going through the steps of creating a toy rotation, but let’s go into some more detail now. Whether or not you tell your child ahead of time that you’re going to start a toy rotation is very dependent on their age. The younger you start this routine, the less of a shock it will be and the less a conversation about it will be necessary. You don’t need to talk to an infant, of course. But what about toddlers that are more aware of their surroundings? What about toddlers who can’t yet hold a conversation with you?
My personal recommendation is that if your toddler is prone to emotional outbursts, have a chat with them about what to expect several days before you actually create your toy rotations. Set a date on the calendar, and help them count down to the day that their toys will look different (or “go on vacation”) when they come home. This way it won’t be such a shock to them.
However, if your toddler tends to roll with the punches… Just do it! If they ask where a toy went, tell them it went on vacation but it’ll be back in a few days.
If your child is older, explain the plan to them in clear terms – but be sure to avoid letting them steer the conversation. You don’t want to end up in a debate or negotiation over what toys to keep and when to make them available. This defeats the purpose! Some older children may need assurances that their toys aren’t all gone. It can be good to have a few well-known favorites in the first rotation to combat any feelings of loss in the beginning.
Also – and this is very important! – always make sure rotations are done after your child goes to bed or while they’re gone. Watching toys be boxed up and carted away is never fun, even if new ones are put in their place.

