
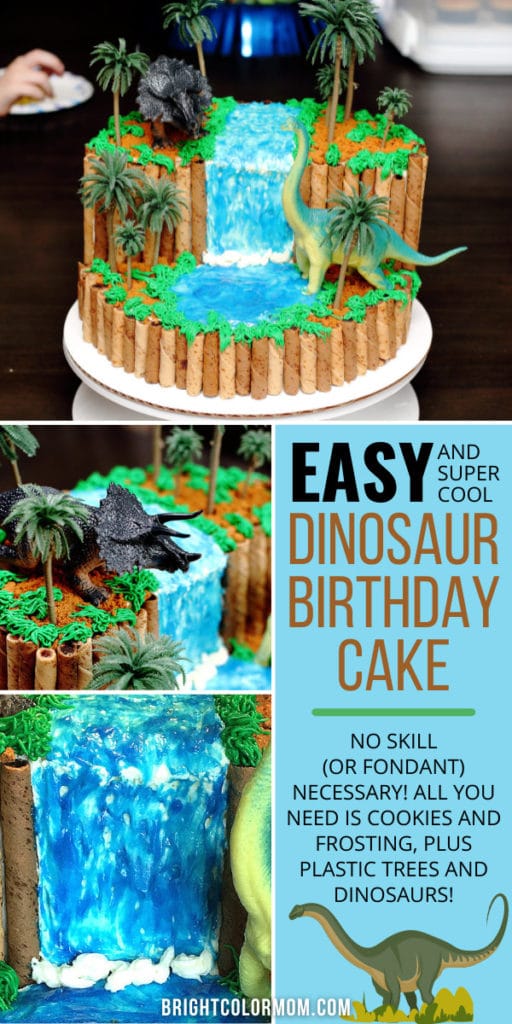
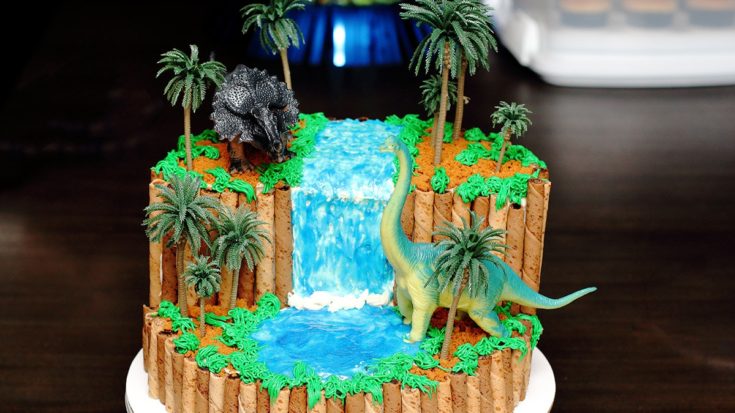
When my son said he wanted a dinosaur birthday party, I had no idea what kind of cake to make. I knew I wanted it to be an easy dinosaur birthday cake, but I always try to make my kids’ cakes look really cool. I hopped onto Pinterest to search for easy dinosaur birthday cake ideas, and I was not disappointed!
Most of the dino cake ideas were either buttercream-frosted cakes made with a dinosaur-shaped cake pan or lightly decorated round cakes with fondant or plastic dinosaurs on top. But I really fell in love with one that had a pond – and decided to take it a step further into a full-blown waterfall! And while my dinosaur cake design might look complicated, it’s actually the easiest (and fastest) I’ve ever made!
How This DIY Dinosaur Cake Was Constructed
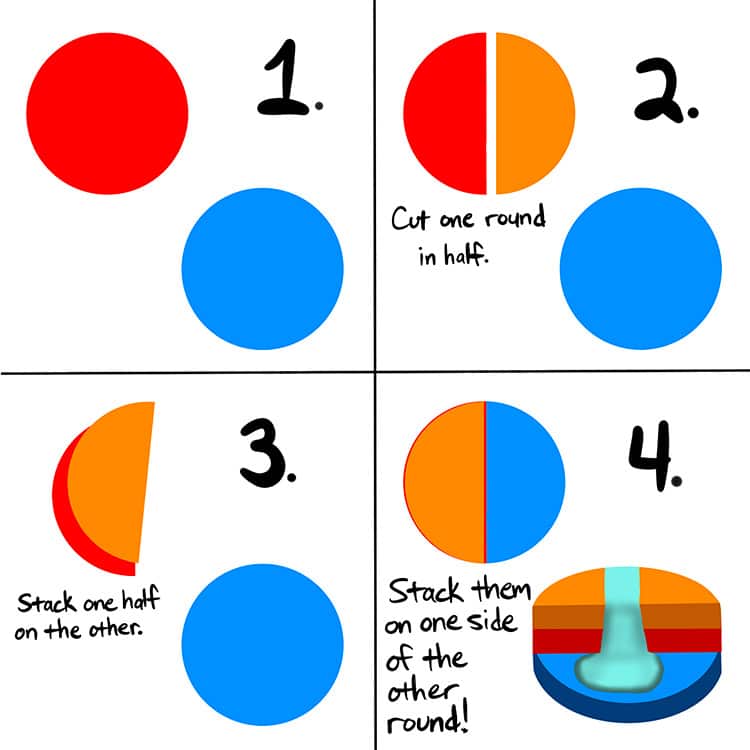
This is a great dinosaur birthday cake because not only is it easy, it looks big. Just look at the size of the waterfall! But technically, this is only a 2-tier cake. The secret to this look is in how the waterfall was made.
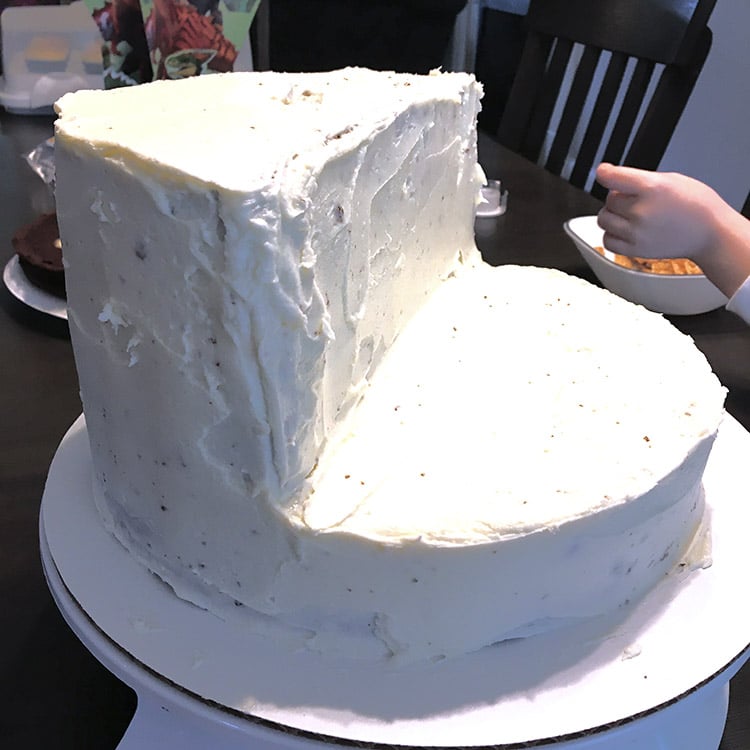
I only baked two cake rounds. Then after leveling the tops, I cut one in half and stacked it on itself. Then I stacked those on one side of the remaining cake. Voila! I suddenly had a three-tier cake with a two-tier cliff for my waterfall.
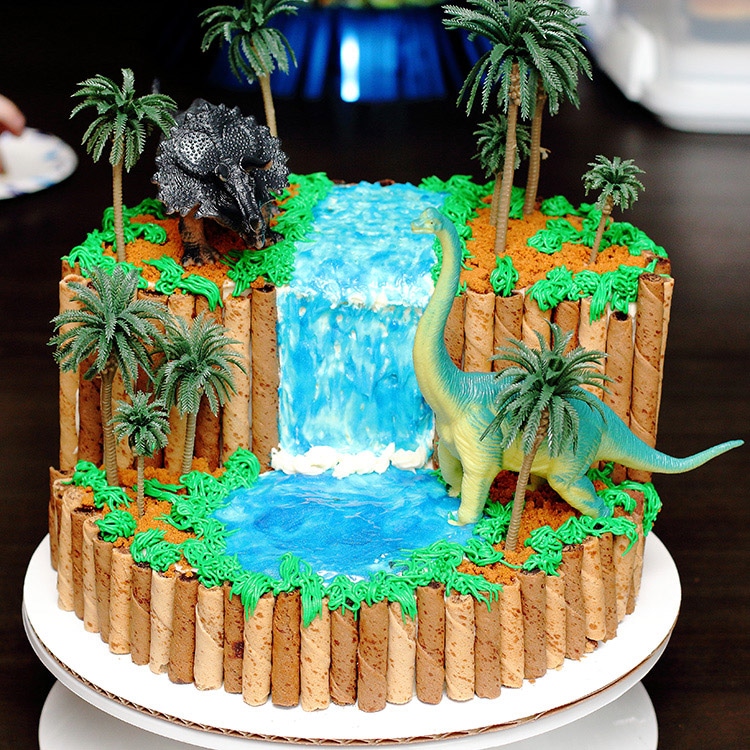
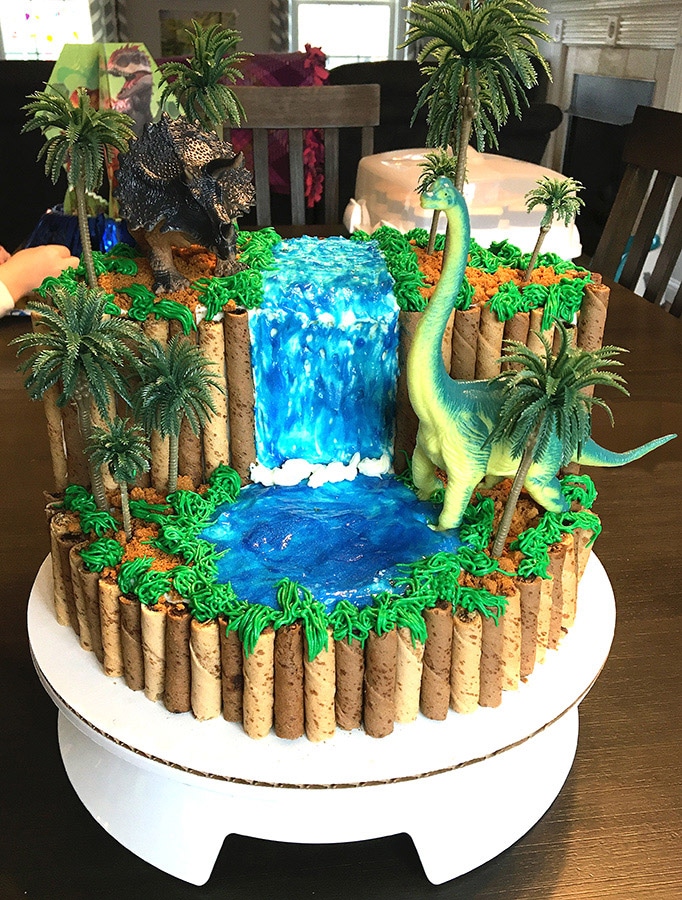
This also happens to be a buttercream dinosaur cake, even though it’s hard to tell. Almost all of it is covered up by something else! And unlike the sheet cakes of the past with cheap little toys on top, using plastic dinosaurs as decoration is no longer a cop-out. Instead, they totally enhance the realistic look of the scene! Fondant dinosaurs just wouldn’t go well with how detailed this cake looks.
This post may contain affiliate links. If you make a purchase after clicking one, I may receive a small commission at no cost to you.
Dinosaur Cake Tutorial
“Recipe” really isn’t the right word here, because the only cooking involves the baking of the cakes. It’s a step-by-step tutorial! But I do tweak boxed cakes and make my own frosting using Wilton’s buttercream recipe, so I’ll include all the food supplies needed.
Ingredients Needed
For Cakes
- 3 boxes Pillsbury Moist Supreme Devil’s Food Premium Cake Mix
- 1.5 cups vegetable oil
- 3 cups milk (not skim)
- 9 eggs
- Baker’s Joy
For Buttercream Frosting
- 1.5 cups shortening (1.5 Crisco sticks), divided
- 1.5 cups of butter (three sticks), divided
- 12 cups sifted powdered/Confectioners sugar (about 3 pounds), divided
- 3 tsp vanilla extract, divided
- 3-6 Tbsp milk, divided
Decorations
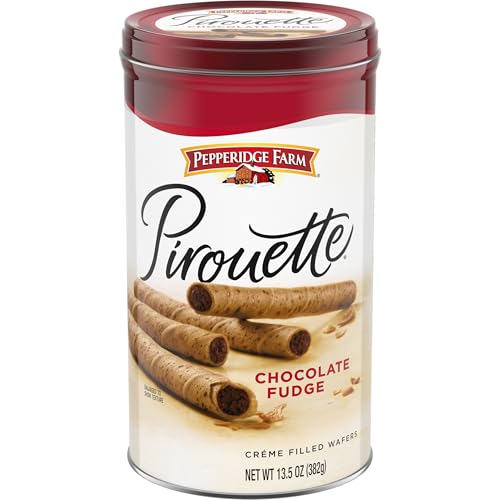
- (3) 13.5oz cans Pirouette wafer cookies (any flavor)
- 6oz Biscoff cookies (about 24), crushed
- Blue Wilton Sparkle Gel
- Green food coloring
- Plastic trees
- Dinosaur figures
1. Bake the cakes and let them cool.
For my cake, I baked two ten-inch rounds. I’d already purchased my dinosaurs and was afraid 8-inch round cakes wouldn’t work. I wanted to have plenty of room for the waterfall! But if you have smaller figures, you could definitely do a smaller cake.
I would be careful about going bigger, though! While a 12-inch round cake is probably doable, keep in mind that one side of your cake is going to be much taller and heavier than the other. If you plan on transporting this cake, smaller is better.
While two boxes of cake mix will fit into my mixer at once, I had to run it a second time for the last box. I use a Kitchenaid stand mixer for mixing both my cake batter and my frosting, and I would never recommend another way! Use your wire whip attachment for the cake mix and your flat beater attachment for the frosting.
2. Make the buttercream frosting.
I almost always follow (and double) Wilton’s buttercream frosting recipe when making my cakes. For this recipe, I tripled it since the cake was fairly large and had more surface area to cover. You may have to make two batches – one double and one single. It’s a deliciously sweet, recognizable flavor the whole family looks forward to.
3. Level the cakes, halve one and stack them.
A few years ago I finally caved and spent the money on a cake turntable and leveler kit.

- EFFORTLESS & PRECISE DECORATING: Our 12-inch ForeverSmooth cake…
- SUPERIOR BUILD QUALITY: Featuring our unique, patent-pending…
- ESSENTIAL TOOL FOR CAKE DECORATORS: Endorsed by baking experts and…
- UNLEASH YOUR CREATIVITY FOR ALL OCCASIONS: Whether you’re decorating a…
- ALL-INCLUSIVE DECORATING KIT: Our turntable comes with a complete set…
TOTAL. GAME. CHANGER. I will never go back to moving myself around the cake or leveling with a giant knife by eye. The leveler just requires a gentle sawing motion back and forth as you move through the cake, and I even do it on top of plastic wrap to catch the crumbs for quick cleanup. The height of the leveler is adjustable, so it’s okay if your cake didn’t fully rise or your two cakes are uneven.
Once your cakes are leveled, cut one of them evenly in half. I did this by eye, and while it’s not crucial that they are 100% the same size, you’ll want to get as close as you can. If one does end up a little bigger, put it under the smaller one when stacking.
Put your remaining whole round onto a cake board at least 12 inches in diameter. Stack the two halves on top of each other on one side of the cake, spreading frosting between each layer. If you’re worried about the layers sliding around, you can insert a dowel rod or two through the whole stack to help keep it in place, but cake boards shouldn’t be necessary.
4. Frost the entire cake.
Now that you’ve got your “cliff” assembled, frost the whole cake! Be sure to set aside some frosting to use for your green grass, though. You’ll also want a little white frosting left to outline your waterfall.
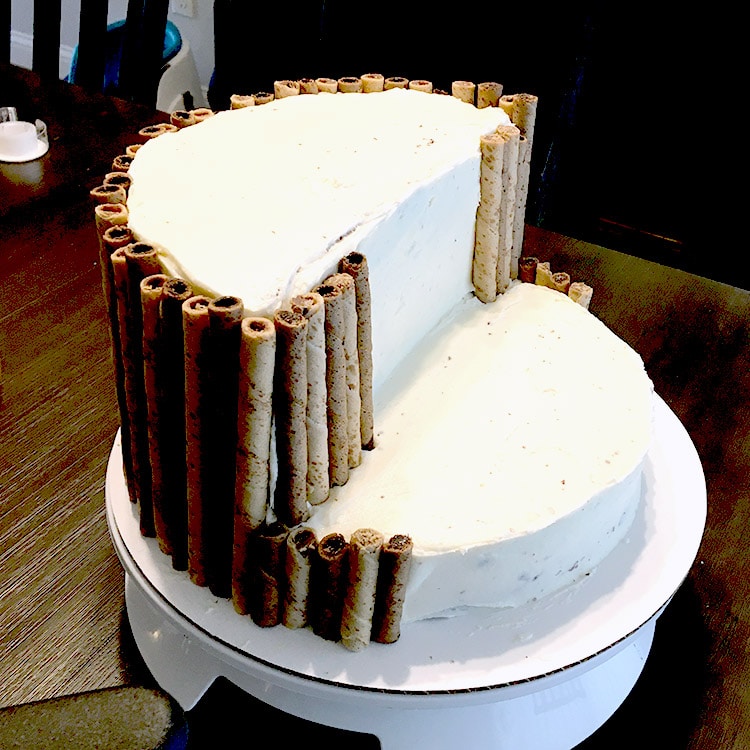
Be generous with the icing, especially on the sides. Thicker frosting will give the Pirouette cookies more space to press into the cake and act as glue to hold them in. The good news? You don’t have to worry about making this smooth and pretty. At all! Just spread the frosting as evenly as possible.
5. Press Pirouette cookies around the sides of the cake.
I bought two flavors of Pirouettes (chocolate hazelnut and chocolate fudge) and a total of three regular-sized cans. We used almost all of the cookies. Crack open your Pirouette cans and start pressing the tallest ones into the tall part of the cake. I started on one edge and worked my way around to the other side of the semicircle.
Once the tall ones are in place, check for any broken cookies that are the right size to put in either the sides of the cliff moving toward the waterfall or on the short edge around the front. Then as needed, cut your remaining Pirouette cookies to size to fill in these areas. I used a small, well-sharpened knife from the butcher block to do so.
6. Pipe extra frosting where you want your waterfall and plunge pool to be.
To make the cake waterfall look more realistic like rough rapids, I piped some additional white frosting using tip #7 from this Wilton kit I bought. I just did rough, moderately straight lines and pieces starting from the top back of the cake and going down to where it met the bottom. They don’t have to be solid ropes of frosting; just pick up where one breaks off.
I also piped a line to illustrate how big I wanted the plunge pool at the bottom to be, but I didn’t pipe any extra lines over the pool itself. I wanted it to be smoother and more like a small lake.
If I were to do it again I’d do one thing differently, though: I’d add some meringue powder to the remaining white icing I set aside to help it crust and firm up a little more (and faster) for the waterfall. This is because once I started painting with the blue sparkle gel, some areas were mushed down quite a lot under the paintbrush.
Overall, the white mixing with the blue lent itself to a realistic look, but I’d have liked to have kept more of my raised lines and shapes.
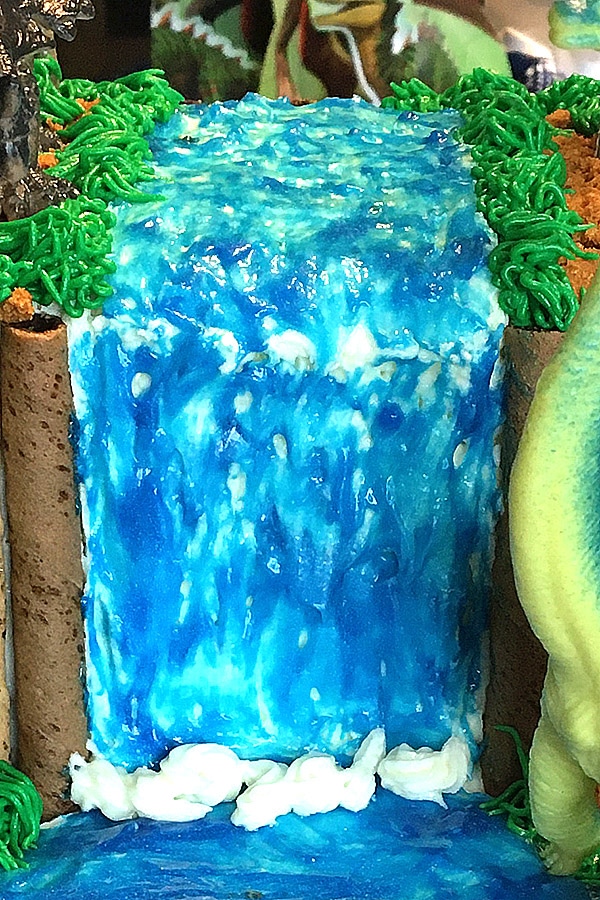
7. Paint your waterfall with blue sparkle gel.
This is where the magic really starts to happen! Just make sure you’re using the regular blue, NOT the light blue, or it won’t look quite right. If Walmart is out of stock, sometimes you can find it on Amazon.
While you could probably just squirt the gel straight onto the waterfall and spread it around with a paintbrush, I preferred squirting the gel onto a small paper plate, dipping my food-safe paintbrush in it, and carefully applying it to the waterfall.
This was the most time-consuming part of the cake for me. I’m a bit of a perfectionist, and I wanted it to look as realistic as possible! My main tip is to not over-apply it to the stream and waterfall. Let some of the white shine through so it looks a bit foamy like real rapids.
I used a LOT of blue gel on the plunge pool, though. I wanted it to be as dark as I could get it so it looked really deep, adding the most gel right in the middle and leaving it thinner around the edges.
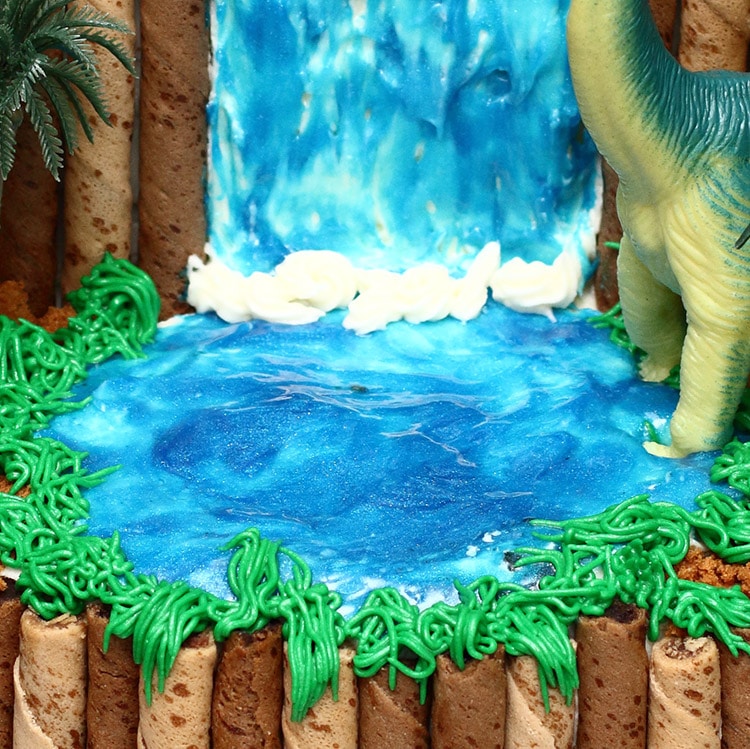
Once the waterfall was painted, I decided to pipe just a bit of white frosting at the base of the waterfall (using Wilton tip #10) to try and mimic the massive foam and crashing water of a real one.
8. Cover the rest of the cake with crushed Biscoff cookies.
This part is insanely easy. I just emptied a sleeve of Biscoff cookies into a gallon zipper bag, pressed the air out of it before zipping, then took my rolling pin to it. They were all crushed into fine “dirt” in no time! I left a few small chunks just for visual variety.
Use a clean hand to grab a fistful of cookie crumbs and sprinkle them over the remaining white parts of the cake. Now you have (extremely tasty) dirt!
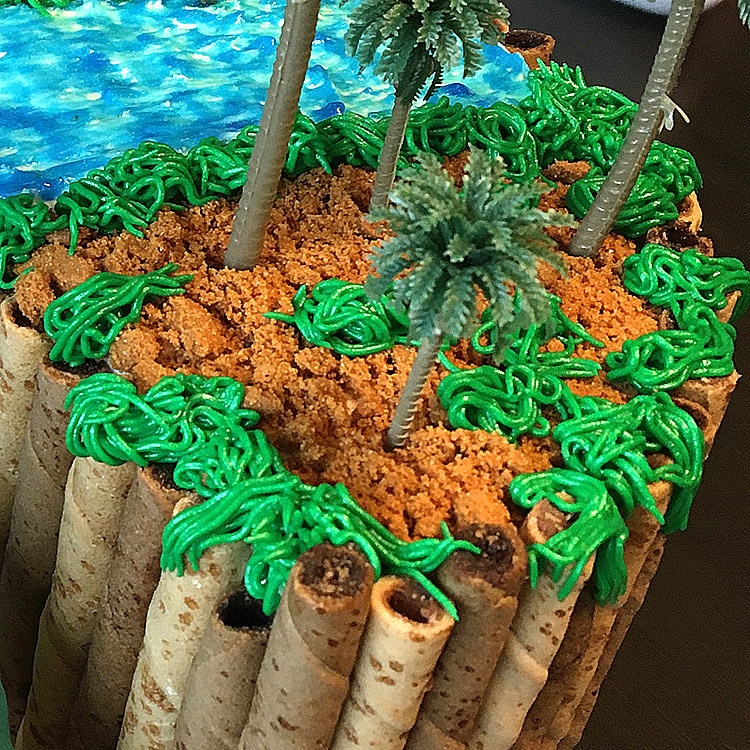
9. Insert fake trees as desired.
I found this incredible bag full of palm trees in all different sizes. And they were great sizes for the cake.

- Cake Topper: These cute little palm trees were a perfect addition to…
- Wide Application: Artificial plastic coconut trees are suitable for…
- Easy to Use: Model trees are made of quality plastic, realistic shape…
- Various Size: The package includes 18pcs mixed model palm trees(Other…
- Warm Tip: For children under the age of 12, please use under adult…
I placed the trees randomly around the cake, keeping in mind where I wanted my dinosaur figures to stand so I didn’t put them in the way. The larger trees did need to be pressed into the cake almost a whole inch to not fall over.
Side note: Do palm trees grow near waterfalls? I don’t know. I didn’t care. They looked cool, and that’s what matters!
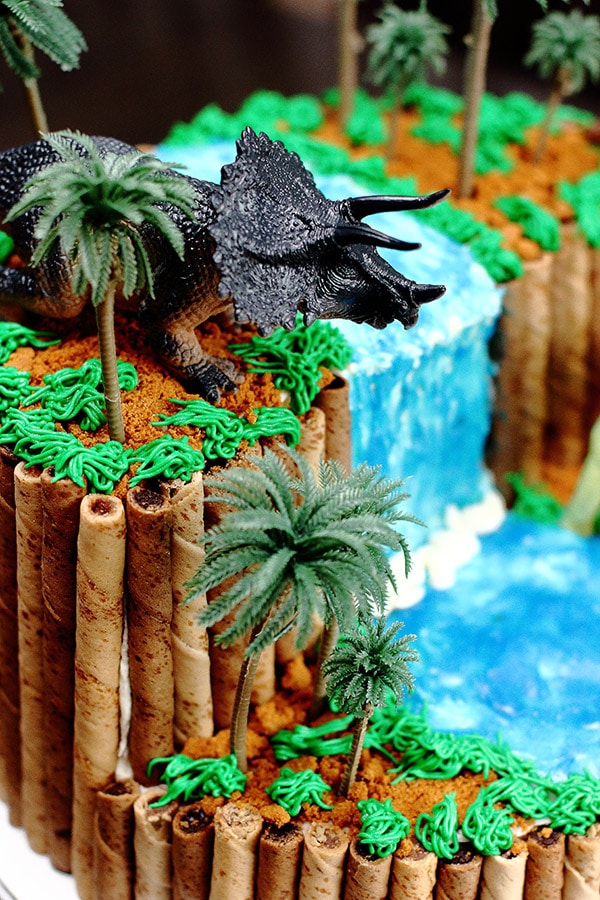
10. Pipe green “grass” throughout the landscape.
This step isn’t totally necessary. I just thought it lent itself to a more visually interesting landscape. First, I used Wilton’s Kelly Green food coloring gel to color the frosting I set aside. It was the green I had on hand, but if you can find it, Juniper Green is a more muted, realistic color for landscape greenery.
We used tip #233 from that same Wilton kit I mentioned before to pipe tufts of grass randomly throughout the scene. Again, I wish I’d used a little meringue powder or some extra powdered sugar in the remaining frosting to stiffen it up a bit. But since this was supposed to be prehistoric times anyway, I just made long flowing bunches of grass that lay down on the ground. It’s never been mowed, after all, just eaten by herbivores!
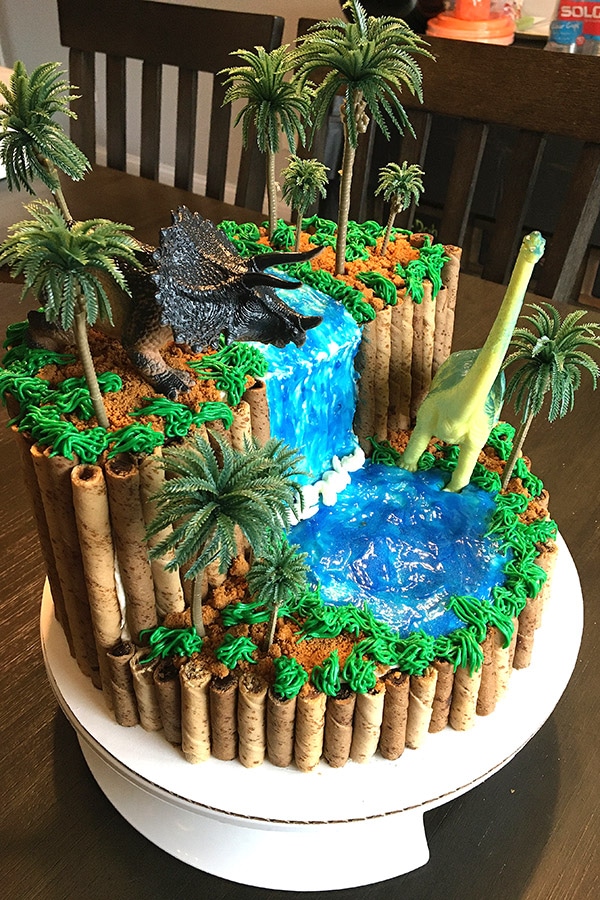
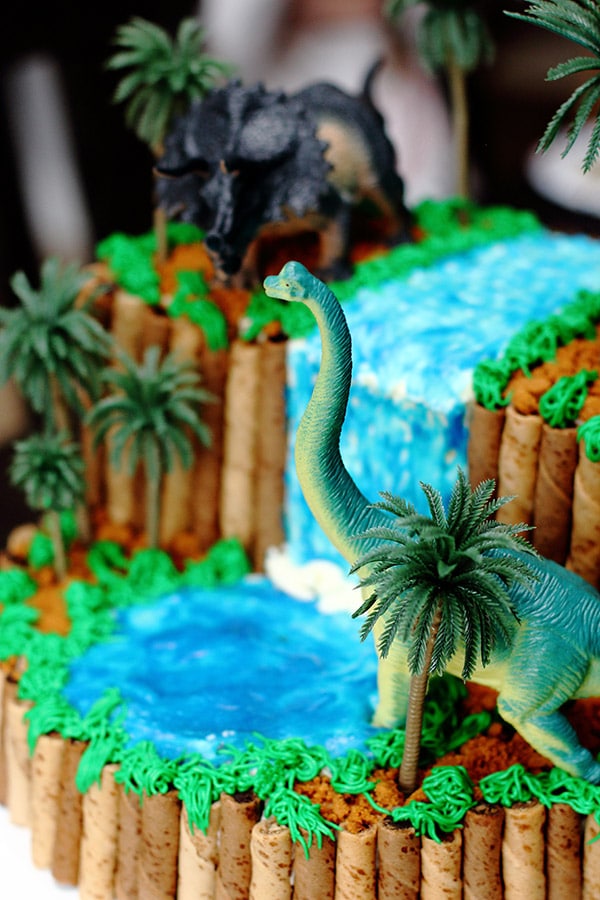
11. Add dinosaurs!
I found the perfect dinosaurs in the $1 toy bins at my local Walmart. The triceratops and brachiosaurus were detailed, sturdy plastic without being too heavy. Amazon also has some pretty good dinosaur figures. The ones I bought were slightly bigger than I’d imagined for the cake, but they worked out just fine.
I chose to put one on each level of the cake, with the tall brachiosaurus’ neck craning over the top of the waterfall. Again, not true to size in real life, but it looked cool. His foot was also pressed into the pond – perhaps for a quick cool-down?
And that’s it! A homemade dinosaur cake that looks way more complicated than it really is.
FAQ & How to Customize
Can I use different cake and frosting flavors?
Absolutely! My son loves chocolate so we went with Devil’s Food, and I used plain vanilla buttercream because that was easiest for me. Any flavor of cake will do, just don’t try anything fancy like a sponge cake. Stick to a standard, fluffy cake. As for the frosting, the flavor doesn’t matter, but I do recommend having some white frosting at least for the waterfall because it will show through the blue sparkle gel.
On the other hand, if you want your waterfall to look really dirty and muddy, chocolate buttercream might be just the ticket! Chocolate buttercream would also be superior for hiding any “cracks” showing between Pirouette cookies. I just didn’t put in the effort to make separate batches of frosting. But please do stick to a firm but flexible buttercream-style frosting, as it makes it easier for the Pirouette cookies to stick to the cake.
Can I use canned frosting?
You’ll need many, many cans of frosting to have enough for a cake this size. Plus, the shelf-stable canned stuff tends to be too thick to spread easily over a large surface area. That being said, there are options! It’s pretty easy (and cheaper) to make from scratch, but Wilton does offer a prepackaged powder mix to eliminate the measuring. Be sure to get three boxes to triple the recipe.
If you really don’t like making your own icing, Wilton also sells tubs of ready-to-use white icing! While I think it tastes different from homemade (likely due to preservatives), it is not bad. Just different. If Walmart is out of stock at the link above, Amazon has it below.

- This tub of buttercream frosting is enough to cover two 8-inch 2-layer…
- White vanilla flavored icing Can be refrigerated and stored for up to…
- 4 lbs. (1. 81 kg)
- Made in a facility that also processes peanuts, tree nuts, egg, milk…
- Made in the USA
Can I just make blue frosting for the waterfall?
Can you? Yes, absolutely. It will look okay. But I strongly recommend the blue sparkle gel instead. It has that iridescent, reflective quality that tricks your mind into thinking the light is bouncing off of real water.
Can I use a cookie other than Biscoff?
Any cookie that crumbles well would be fine. Chewy cookies or really hard/crunchy cookies won’t turn into a very fine crumb. Also, Biscoff just tastes amazing and I love having an excuse to eat it.
Is there an alternative to Pirouette wafers?
Yes! If you can find them near you, there are similar cookies called Creme de Pirouline. Pirouettes are just local to me. As for totally different kinds of treats, nothing else quite gives that natural rock vibe in appearance that I know of.
Kit Kats are a suitable alternative for shorter cakes (or if you’re willing to stack two or three of them on top of each other to reach your cake’s height). Any long treat could technically be attempted, like licorice, or even Nutter Butter bars pulled into two long halves.
Can the cake be assembled ahead of time?
It should be okay to assemble this cake the day before and have it still look the same (and be safe to eat) the next day. However, the Pirouette wafer cookies will definitely become chewy instead of crunchy by the time you eat them. My cake sat after completion for about four hours until being eaten, and the wafers were already soft and chewy instead of having their usual crunchiness.
How do you cut and serve this thing?
Cutting the cake was pretty simple! After removing the dinosaurs and trees, I just started cutting through the top two layers (the cliff) in between Pirouette cookies. This left the bottom layer without a cookie border, but that’s okay. I removed those two layers like a regular two-tier piece of cake, leaving the bottom.
Once the top two layers were gone, I cut larger pieces of the remaining single layer of cake for those who wanted it. The top was plenty to feed nearly 20 guests.
Dinosaur Cake Recipe
Easy Dinosaur Birthday Cake with Waterfall
Believe it or not, this is a very easy dinosaur birthday cake recipe! A few simple steps beyond the usual cake-and-frosting ritual will give you a really cool, realistic dinosaur scene your party guests will be awed by.
Ingredients
For Cakes
- 3 boxes Pillsbury Moist Supreme Devil’s Food Premium Cake Mix
- 1.5 cups vegetable oil
- 3 cups milk (not skim)
- 9 eggs
- Baker's Joy
For Buttercream Frosting
- 1.5 cups shortening (1.5 Crisco sticks), divided
- 1.5 cups of butter (three sticks), divided
- 12 cups sifted powdered/Confectioners sugar (about 3 pounds), divided
- 3 tsp vanilla extract, divided
- 3-6 Tbsp milk, divided
Instructions
- Preheat the oven to 350 degrees F. Prepare the cake mixes as directed on the box, but substitute 1 cup of milk for each 1 cup of water called for. Divide batter evenly into two 10-inch round cake pans prepared with Baker’s Joy. Bake in the preheated oven for 60-80 minutes, checking at 60 minutes and every 5 minutes after to see if it’s done. (To check for doneness, insert a clean toothpick near the center of the tallest cake. If it comes out without wet batter on it, the cakes can be removed.)
- Allow cakes to cool in the pans on cooling racks for 30 minutes. Then, place a rack over one cake pan at a time, inverting the two so the cakes release from the pans onto the cooling racks. Allow cakes to cool completely before assembling the cake or wrapping to store overnight.
- Set out your 3 sticks of butter to soften for at least 30 minutes.
- In the bowl of a stand mixer, cut up TWO sticks of your softened butter as well as one WHOLE stick (one cup) of shortening. Cream on medium speed until fluffy. Add TWO tsp vanilla extract and beat in, scraping the sides of the bowl as necessary.
- Gradually add EIGHT cups of powdered sugar, one cup at a time, mixing on low speed to combine each cup before adding more. Work your way up to medium speed, scraping the sides as needed and mixing until all sugar is combined and the frosting is dry and somewhat stiff.
- Add milk, one tablespoon at a time, to the frosting, beating in between until it just reaches a spreadable consistency. You don’t want it to be runny or have it slide off the sides of your cake.
- Cut the rounded tops off the cakes and level them. Cut one of the rounds in half, stacking the halves on top of each other with a layer of frosting spread in between. Frost the top of the remaining round, and place this stack onto one side to form a “cliff.” Finish frosting the entire cake. If more frosting is needed, repeat steps 4-6 with your remaining frosting ingredients (half of what was used the first time).
- Open your Pirouette cookies. Starting with the unbroken/tallest ones, place them around the tallest side of the cake from one side to the other. If there are broken pieces, place them around the shortest side and toward where your waterfall will be. Trim Pirouette cookies to size as needed. Leave a gap in the middle of the two-tiered portion for your waterfall.
- Using a piping bag and a #7 Wilton frosting tip, use leftover white frosting to outline your river, waterfall, and plunge pool below. Then pipe long, imperfect lines starting from the back of your river down to the base of your waterfall, restarting lines as needed. There should be plenty of bumps and waves to mimic rushing water. No extra frosting is needed over the plunge pool area.
- Squeeze a generous amount of your blue sparkle gel onto a plate, Using a food-safe paintbrush, start at the back of the river and work your way down the waterfall, painting it with the gel. It’s okay for the white frosting to show through because it will mimic foam and bouncing sunlight. When you get to the plunge pool, squeeze more sparkle gel from the tube directly onto the cake and spread it out with your paintbrush. The gel should be thicker (with almost no white showing through) in the center of the plunge pool and gradually get thinner near the edges.
- Using Wilton frosting tip #10, pipe bits of white frosting at the base of your waterfall to mimic where the waves crash into the pool and create foam.
- Place your Biscoff cookies into a resealable bag, pressing out any air. Using your hands or a rolling pin, crush the cookies into fine crumbs (some larger crumbs are okay). Using a hand, sprinkle fistfuls of cookie “dirt” over the remaining exposed areas of white frosting. When finished, every part of the cake should be covered with either Pirouette cookies, blue sparkle gel, or Biscoff crumbs.
- Insert your plastic trees throughout the dirt, leaving room for your desired dinosaur figures. 8-12 trees should be plenty. Larger trees may need to be inserted deeper into the cake, leaving gaps; simply scoot some cookie dirt in to fill them.
- Mix green food coloring into remaining frosting to the desired color. Using a #233 Wilton tip, pipe “grass” as desired over your dirt and around your trees. It’s okay for some of it to lay around the edges of the plunge pool as well.
- Add your dinosaur figures to the cake, slightly pressing them into the dirt and frosting to secure them as needed. If possible, have one put its foot into the plunge pool and add some extra blue sparkle gel over his foot to give the illusion he’s about to walk in!
Notes
You can use any flavor of cake you prefer, but I always recommend using Pillsbury Moist Supreme cake mixes for birthday cakes.
Recommended Products


Nutrition Information
Yield
28Serving Size
1 sliceAmount Per Serving Calories 650Total Fat 27gSaturated Fat 8gTrans Fat 0gUnsaturated Fat 10gCholesterol 24mgSodium 364mgCarbohydrates 98gNet Carbohydrates 97gFiber 1gSugar 75gProtein 4g
Nutrition information is based on the manufacturer labels for each ingredient, and may not always be accurate.
Before You Go
- Dinosaur birthday invitations – FREE download inside!
- Check out EVERY detail of my son’s dinosaur birthday party


I’m trying to figure out why you need 3 boxes of cake mix when 1 box is good for both levels (the 2nd of which you cut in half to stack)?
Hi Christen! A standard box of cake mix usually says it will make two 8-inch rounds with about 4 total cups of batter, and they usually do not expand over the lip of the pan. For this cake, I made two 10-inch rounds and I wanted them to be the full two-inch height of the pan after trimming the tops.
Per Wilton’s cake baking guide, a 2-inch tall 10-inch round needs about 6 cups of batter to bake to the top, which is 12 cups of batter total for two rounds. With boxed mixes that make about 4 cups of batter each, I needed three to meet that requirement.
You could almost certainly get away with just two boxes of cake mix, one per 10-inch round; they just might not bake evenly to the very top of the pan. Hope that helps!
Hi Michelle, I am planning on making this cake for my son’s birthday. You mentioned adding dowels. Can you please explain a bit more how and where to add them?
I’m a total newbie cake decorator. Thanks!
Good question! Dowel rods are optional for this cake, in my opinion (I did not use them and had no trouble). But since we’re technically making a three-tiered cake, if you want to make extra sure none of the layers slide around before your party, you may want to insert some full-height dowels (2 or 3) into the middle area of the tall side. If you make it three layers with each one a full two inches tall, you’ll need six-inch dowels. Just make sure you use food-safe dowels (craft ones are usually NOT food safe) or special plastic straws made just for cakes. Don’t put them too close to the edges, and spread them out around the middle of the tall area (at least 1.5 inches apart). Make sure you do this before decorating!
I made the cake yesterday!! It was so much fun! I didn’t get the blue sparkle gel, it got damaged on the way to my home and so I ordered some disco cakes edible blue glitter on Amazon. So I of course colored the buttercream blue for waterfall and used a brush to blend it around to look more realistic and when I got done sprinkling the glitter I used same brush to blend and distribute. I had a blast making it and Zeekie absolutely loved it too.
Bethany, I am so glad to hear you were able to make it work without the blue sparkle gel! I saw your photo on Facebook and I am certain Zeekie was blown away by your cake <3
Your instructions were so easy to follow!!! Had a great time making this🤗
This recipe worked fantastically for my two year old’s birthday! I had so much fun making it and it was truly deceptively easy. To make it even easier, because I have a three week old baby to juggle, I used store bought white chocolate mud cakes for the base. They were a little taller and smaller in diameter than the cakes in the recipe but it worked fine. I stuck three food-safe wooden skewers into the taller side of the cake for extra security. I had some leftover tylose (thickener) from a previous cake project which I used to make the buttercream for the waterfall more textured. Otherwise I followed the steps just as written, and I was glad to find the blue sparkle gel as I live in Australia.
Thank you! I was proud of my cake and my daughter loved it but it only took an hour or so to decorate.
I just made this cake for my 3 year old! I made my own cake mix, used 2-8in pans, and made my own vanilla buttercream. I’ve recently fallen in love with luster dust! So I used that for the waterfall and dipped my brush into some royal blue gel food coloring to give it more depth. Thanks for the inspiration!
Hi, we don’t have shortening here, can I just make normal buttercream (sugar, butter, vanilla, milk) or can you recommend a recipe that would work better and doesn’t use shortening? Thanks!
Yes, the shortening can be substituted with an equal amount of butter!
So first I want to thank you for this great idea!! My grandson had a Jurassic Park themed party yesterday for his 4th birthday and my cake was a huge hit with him and everyone there! I used your idea here and put my own spin on it. Posted picture to Pinterest and tagged you (I hope I did it correctly). Thanks again!!
I am planning to make this cake this weekend for my son’s birthday. I have never really worked with homemade buttercream before. I know you mentioned you can make the cake a day in advance. Can I make the buttercream a few days in advance and refrigerate until I’m ready to use? If I make the cake the day before is it ok to leave on the counter or does it need to be refrigerated? I make cookies so I have a ton of gel food coloring on hand, is that what you use to color buttercream? Thanks so much for any advice. I’m excited to try this out! I think my son will love it!
Buttercream can definitely be made in advance and refrigerated for up to two weeks! Just make sure you let it sit on the counter to warm up a bit and give it a really good stir before you start decorating.
A cake baked the day before should be allowed to completely cool, then wrapped in plastic wrap. I leave mine out on the counter; they can be refrigerated, but this isn’t necessary.
Buttercream can be colored with gel food coloring or color drops, both work great!
Fantastic cake, thank you! The kids loved it! Followed most of the tips and it worked super well. I made my own recipe chocolate cake and used about a third less sugar in both icing and cake. Still sweet and magnificent! Used two different colors of Corinthians sticks for the logs just to see how it would work. Thanks for the wonderful instructions and inspiration for this great cake!
We did it! We over analyzed and read everything you wrote 200 times! Ha! We had a few tweaks that worked for us. About 45 min to bake (3 mixes 10″ pans). We were making the cake on a Thurs for Sat, so we held off on putting the pirouette sticks on until sat AM. Cakes made, icing on, waterfall made, the cookies crumbled prepped. Then sat am used an easy squeze cookie icing pack as glue and stick the sticks all around the front. Which worked great! Then used the “drip” chocolate for the backside of the cake (since isn’t seen) and drizzled a little behind the ledges of cookie sticks- helped them stick but also added a little dirt/mud affect. I opted for only a few icing grasses and two fake bushes that came with dinos. We did a dino egg. And also we did use the cake rods, due to traveling with cake. I am beyond proud of this cake!! Thank u for the detail instructions!!! What other cakes ya got to follow?! 🙂
So this Is my first attempt at making a homemade decorative cake, and I went through every emotion but my end result was decent. Not as good as yours but not bad for a first timer!
Thanks for the awesome Dinosaur cake design! My 4 year old grandson wanted a dinosaur cake for his birthday and I didn’t have a pan so was at a loss for design ideas. I was pleased to find your
cake. It was very easy to make and assemble. I had it completed in an hour and, your right, it is very forgiving. Smoothing the icing is not required! It was a hit of the party and everyone was so impressed! I used 2 boxes of the Duncan Hines butter recipe golden for 2- 10″ pans. It was enough batter.
Well this was pure fun to make. I used some old recepie for a cake and succeded 😎 Thank you for the idea and detailed instructions 💙
You are so welcome, Milena <3
Was supposed to make a waterfall cake and came across this one while searching. I’m not very good at cake decorating, but this was easy enough and turned out great.
I’m so glad I found this tutorial! I just made it for my grandson’s 5th birthday and he loved it! Thank you so much for your wonderful instructions! I had so many positive comments on the finished product! I have 13 grandchildren and often make their cakes but this one was by far my favorite!
Excellent instructions! My grandson wanted a strawberry cake with chocolate frosting, so I made a chocolate buttercream. You were correct using a chocolate buttercream that It didn’t matter if there was a little space in between the Pirouette cookies. I also only used two boxes of cake mix; if I had use three the cake would’ve been way too tall. The blue sparkle gel worked perfect on white frosting. What a success!
Thanks so much Kelly! You are right that three cake mixes makes extra-tall cakes. I like them to bake up over the rim a bit so I can get a really clean cut with my cake slicer! (And then we all enjoy eating the ‘cake tops’ as an extra treat, too.)
Thank you so much! This was my first theme cake and it didn’t feel overwhelming at any point. We have quite an enormous amount of cake to somehow eat but I’m sure it’ll be delicious….the pieces I tasted along the way we’re certainly yummy. I can’t wait to see the look on my three year olds face tomorrow for her birthday. I am so proud of myself and I think it turned out fantastic!!!
Just wanted to let you know I followed your instructions for my son’s fifth birthday party and it turned out great!! I don’t know if I would have had the guts to try it if you hadn’t explained things so well! Everyone was very impressed – thanks for sharing!
Aww Liz I am so glad to hear it!! Thanks so much!
I made this for my Granddaughter’s 5th birthday. It was fun to make and put together. I appreciate the creativity and the specific instructions! It came together nicely. Thank you!
I made this for my son’s 4th birthday! Had to make some adjustments, but it turned out AMAZING! Loved the idea with the pirouettes!